... or, How to Barter.
A while back I thought about selling on etsy. I had (have) a store on hyena cart but I am not great at self-promotion and, so, it has never taken off. I have made a bit of money selling custom-made dresses locally. With that, most of the time someone will see Alice, drool over whatever she's wearing and ask if I can reproduce it for their daughter / granddaughter / niece / etc. Sewing for money is okay, but what I love to do is to barter. I have exchanged sewing for other crafts, professional massage, childcare, music lessons for Alice, and rehearsal time with a pianist. Bartering is awesome because it allows me to do things that I otherwise could not afford in exchange for doing something that I love to do.
Over the few years that I've been bartering I've developed a pretty good system for making sure both parties come out feeling like they've gotten a good deal.
First we define specifically what they want me to sew. Curtains for one room? Lined or unlined? A little girls dress? Smocked? Monogrammed? Are we using my material or are they providing material?
Then I assign an hourly wage to my sewing. This is not always the same. For example, I charge more per hour for projects I detest, like home dec, and people who are good friends get a reduced rate. I don't have a good formula for figuring out my wage, it basically boils down to how much makes it worth it to me to take on the project.
Once I've figured out how much I want to be paid per hour, I estimate how many hours it will take me to complete a task. This is important for exchanges that might take place before I've finished sewing, such as for childcare.
Then I ask how much the person I'm bartering with charges for their good or service and we figure out what the exchange will be: 10 hours of home dec sewing for 4 hour long massages, 20 hours of clothing sewing for 20 hours of child care, 10 hours of home dec sewing for an original piece of art, etc. When I sew, I keep track of my hours. I have a project notebook for this where I keep all the details of each project along with any expenses I incur and the hours I spend working.
Sometimes I will temporarily suspend a barter if the exchange of services is not happening at an equitable rate. For example, right now I am bartering sewing a wedding dress for childcare. So far I've spent about 3 hours sewing but I've already received about 10 hours of childcare. Since I'm upside-down in the deal (and because Christmas is coming and everyone needs the extra cash) I'm going to propose to pay the bride to babysit until after Christmas when I'll be more caught up.
If you are new to bartering, my advice is to start small. My first barter was actually a simple swap. A friend was sewing purses, which I've never really done, and I was sewing children's clothing, which she had never really done. We swapped a purse for an outfit for her daughter. A good first swap could be for Christmas gifts. If you are making a bunch of the same thing to give and a friend is making a bunch of a different thing to give, it's not so hard for each to make one or two extra and trade. Kind of like a cookie swap, only on a bigger scale.
I have found that most people are pretty excited at the prospect of trading services. I've also always been the first to suggest a swap, so if you want to try bartering, don't be shy about it.
Monday, November 16, 2009
Wednesday, November 11, 2009
Making a Muslin
For this dress I am making a "muslin" which basically means I will be making the wedding dress twice, once out of the "real" fabric and once out of super cheap muslin. Making a muslin allows you to adjust things to get a perfect fit before you cut and sew on your expensive fabric. Since I'm re-drafting the neckline and there are so many things to fit with this dress (and since I'm not paying for the $$$ fabric!) a muslin is a must.
Here's my task list for the muslin:
* copy pattern onto butcher paper DONE!
* re-draft bodice pieces to sweetheart neckline DONE!
* cut pattern out of muslin DONE!
* sew bodice
* sew skirt
* attach bodice to skirt
* insert zipper
* fitting #1!
* adjust muslin to reflect fitting changes, redraft pattern as necessary.
* fitting #2! Check for fit and finalize style elements
* adjust muslin again if needed
* fitting #3 if needed!
Wedding dress!
I am doing something I swore I would never do.
I'm making a wedding dress for someone. Now, I've wanted to make a wedding dress for awhile, the problem is that a lot of women morph into crazed bridezillas the moment the ring hits their finger. I have dealt with enough crazies through playing for weddings. If people get psycho about their music I don't want to witness the insanity that comes with the dress.
So, I had pretty much resolved myself to not ever sewing a wedding dress. I mean, I guess I could have made one for myself out of black for concerts and gigs, but somehow I don't think the symphony fashion police would appreciate a cathedral length train and black veil.... Then I found out that a new friend was engaged. The thing that tipped me off that she might be "the one" was that she was seriously looking for wedding dresses at Goodwill. I offered to barter sewing for childcare. She took me up on it, so now I get to make a wedding dress! (yay!) AND I get some babysitting! (double yay!)
Here is the pattern we picked:
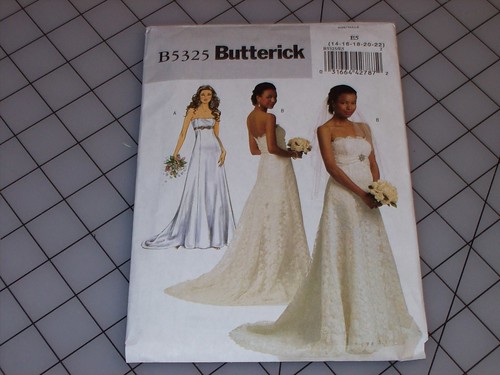
I'm going to modify the neckline to make it a sweetheart neckline. Also, the bride is unsure of her final fabric choice. Not sure if we're going with the lace or not. The wedding is in May, so there is plenty of time to decide.
I'm making a wedding dress for someone. Now, I've wanted to make a wedding dress for awhile, the problem is that a lot of women morph into crazed bridezillas the moment the ring hits their finger. I have dealt with enough crazies through playing for weddings. If people get psycho about their music I don't want to witness the insanity that comes with the dress.
So, I had pretty much resolved myself to not ever sewing a wedding dress. I mean, I guess I could have made one for myself out of black for concerts and gigs, but somehow I don't think the symphony fashion police would appreciate a cathedral length train and black veil.... Then I found out that a new friend was engaged. The thing that tipped me off that she might be "the one" was that she was seriously looking for wedding dresses at Goodwill. I offered to barter sewing for childcare. She took me up on it, so now I get to make a wedding dress! (yay!) AND I get some babysitting! (double yay!)
Here is the pattern we picked:
I'm going to modify the neckline to make it a sweetheart neckline. Also, the bride is unsure of her final fabric choice. Not sure if we're going with the lace or not. The wedding is in May, so there is plenty of time to decide.
Friday, October 30, 2009
Halloween!
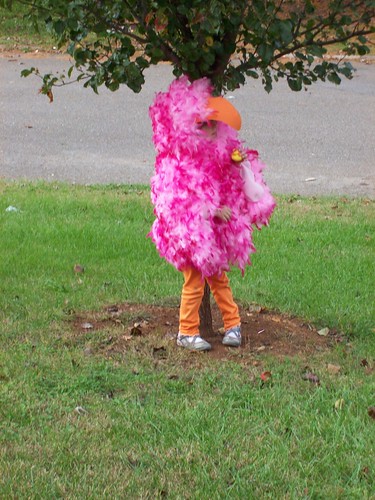
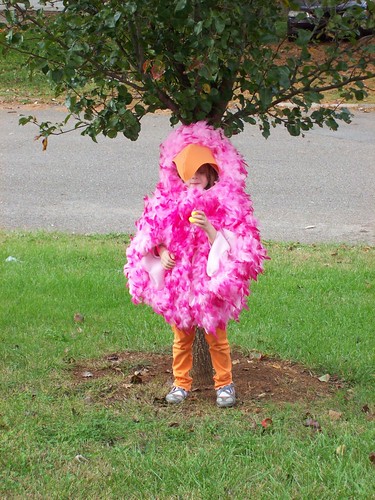
Okay, here is Alice's Halloween costume. (Simplicity 3663) I have wanted to make this for a few years now, but the thought of buying 6 feather boas at $6-8 apiece stopped me in my tracks. This year I decided it was my last chance to influence her choice of costume since I'm sure peer pressure will kick in next year in 1st grade. (ugh!) So I was prepared to bite it and cough up the dough. Luckily I found an online source where I scored 12 boas for $18. MUCH better!
I highly recommend this pattern. First of all, it's hysterical. The pictures are cute, but they don't do it justice. SO cute. It's also really, really easy. It's basically a coat with wings instead of arms. I didn't do any of the finishing the instructions recommended because the feathers cover all that up anyhow and fleece won't unravel. I also didn't line the head piece. I also didn't sew the boas on, I opted for bazillions of safety pins instead. I pinned from the inside. This went MUCH faster than basting, and you can't tell that it's pinned. Also, I used more than 6 boas. I had to order a dozen and I think I used about 9. You wouldn't have to, though. I was just free with the feathers because I HAD them.
I'm trying to think of the "hard part" with this costume, and there really isn't one. The instructions are horrible, as with all the instructions from the big pattern companies. If you can sew by feel this shouldn't be a problem. Obviously I don't have a problem with that since I didn't do half the stuff they told me to do....
Friday, October 16, 2009
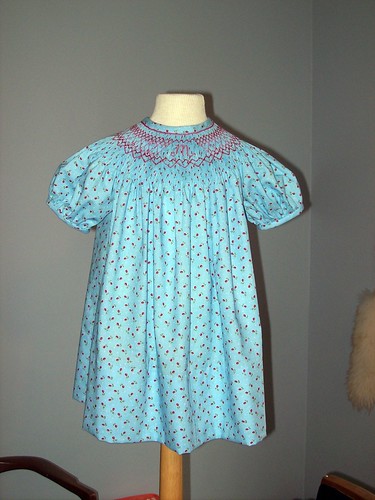
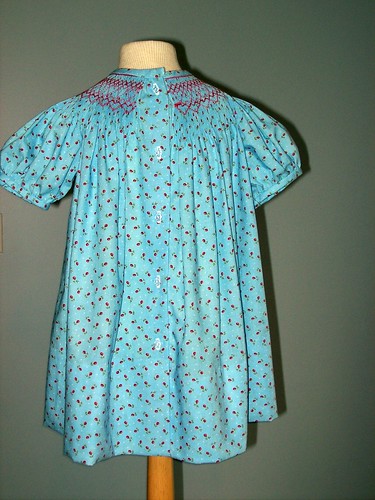
Annika's Bishop
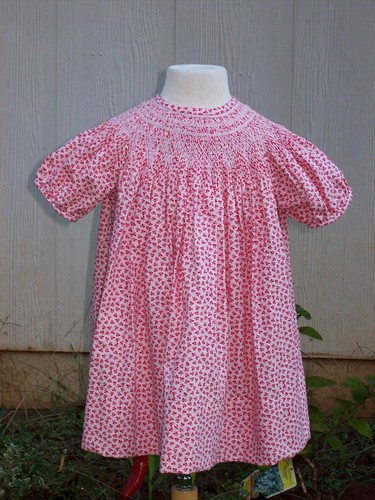
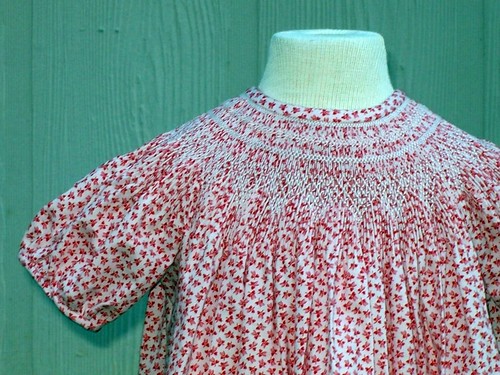
I chose this fabric at the same time I chose the fabric for Miss M's dress. As soon as I saw this fabric I knew who I would be smocking for. I pleated both dresses at the same time, and, as you can see, this one took me a good deal longer to complete than the other. This one gave me fits. (But I learned a lot!)
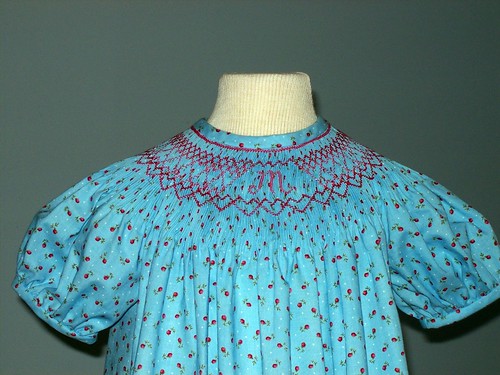
My biggest problem was choosing an embroidery color. The background of the fabric is pale pink and the print is tiny red heart flowers. Choosing the color for the smocking was difficult. The little girl wearing the dress is only two, so I really didn't want to smock in red. White was not quite right either. Eventually I settled on a light pink. I smocked a bit and really didn't like it, so I put it down for awhile.
By the way, this is a good sewing tip. If you get frustrated or something just doesn't seem to be working, put it away for a day (or month.).
When I picked it back up I decided the pink was okay so I kept going. I'm happy with how it turned out. The smocking doesn't hit you over the head: it's delicate.
Also, my photo-taking skills are b a d. Oh well.
Thursday, October 15, 2009
Hug your Babies
Today is a day to remember the babies that didn't make it and the parents who lost them. I am no stranger to pregnancy loss. I have had four miscarriages, the most recent just a few weeks ago. The pain and loss is terrific. As much as we've been through and as much as it's hurt I cannot even fathom what it is to lose a baby to still birth or prematurity. There are no words.
Last summer I learned how to smock. Soon after I discovered Wee Care and began making gowns to donate to area hospitals, first on my own and now through an interdenominational group of women. The gowns that I make are primarily bereavement gowns. That really really seems to bother people. They think it's macabre and I'm often asked how I can possibly make something like *that*. Or people will insist that living babies sometimes wear those garments. Okay, if that makes you feel better, yes, sometimes living babies wear the things I make. I wish that were true for all the gowns I made. It's not.
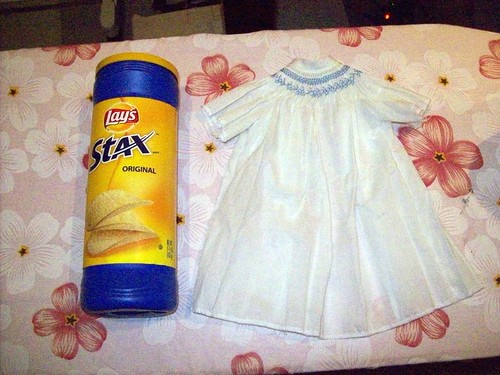
So, why do I make them? I make bereavement gowns because when Alice was born I got a quick glimpse of the hell of prematurity and infant loss. Those mothers deserve the absolute best. There is nothing I can do to take all their pain away, but with each stitch on every gown I pray that having something beautiful that fits their child will bring them at least a little bit of peace.
Here is my most recent bereavement gown (almost done). I used a Lays Stax can for size comparison. This gown will fit a baby that is between one and three pounds.
Last summer I learned how to smock. Soon after I discovered Wee Care and began making gowns to donate to area hospitals, first on my own and now through an interdenominational group of women. The gowns that I make are primarily bereavement gowns. That really really seems to bother people. They think it's macabre and I'm often asked how I can possibly make something like *that*. Or people will insist that living babies sometimes wear those garments. Okay, if that makes you feel better, yes, sometimes living babies wear the things I make. I wish that were true for all the gowns I made. It's not.
So, why do I make them? I make bereavement gowns because when Alice was born I got a quick glimpse of the hell of prematurity and infant loss. Those mothers deserve the absolute best. There is nothing I can do to take all their pain away, but with each stitch on every gown I pray that having something beautiful that fits their child will bring them at least a little bit of peace.
Here is my most recent bereavement gown (almost done). I used a Lays Stax can for size comparison. This gown will fit a baby that is between one and three pounds.
Monday, July 13, 2009
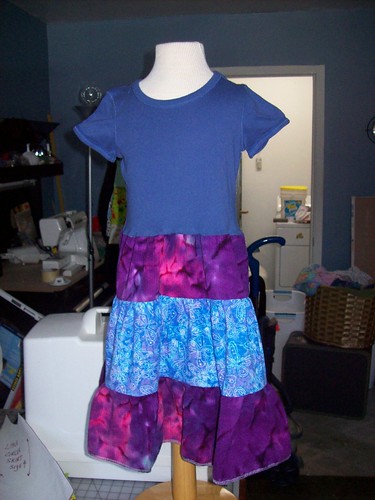
tiered teeshirt dress
Here is another variation on the teeshirt dress. I think this one is easier than the circle skirt variation (although that one is not really hard, either) and after making a few of these you will be a pro at gathering!
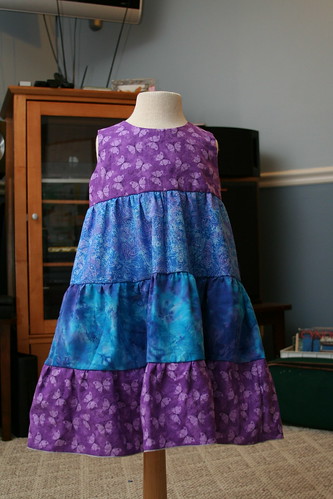
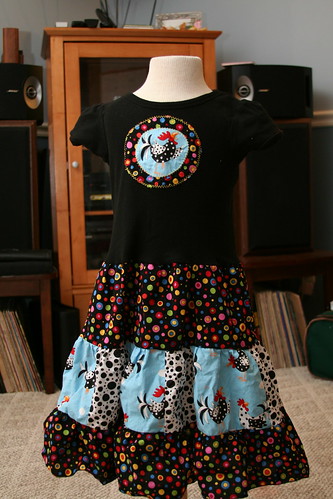
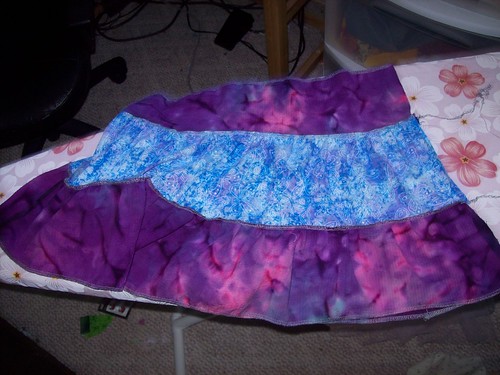
First, gather your materials. You will need a teeshirt and skirt fabric. The skirt fabric is totally up to you. You can use all one fabric and use the tiers to create fullness or you can use multiple fabrics. Not all these examples are on a teeshirt dress, but you can get an idea of the different things you can do with a tiered skirt:
Once you have decided on your fabrics you need to do some (simple) math. Decide how long you want the skirt to be. Divide that by the number of tiers you want your skirt to have. This is how WIDE each tier of the skirt will be except for the bottom tier. For the bottom tier you need to add a hem allowance. If you're folding up twice and stitching like we did in the first dress, add 2 inches.
So, if I want my finished skirt to be 15 inches long and I'm using 3 tiers, the first two tiers will be 5 inches wide (15/3= 5) and the bottom tier will be 7 inches wide (15/3= 5+2= 7)
My formula for determining the length of the tier is:
1st tier = X
2nd tier= X + (1/2 * X)
3rd tier= 2X
My most often used value for X is one cut salvage to salvage (side to side), or 45 inches. The second tier is then one cut salvage to salvage plus another 1/2 cut salvage to salvage and the third is two cuts salvage to salvage.
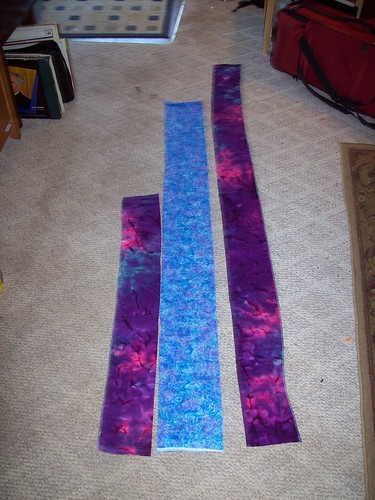
Sew your tiers together. They should look something like this:
Now you're going to gather the longest tier to fit with the shortest tier. Sew the two tiers together being careful to keep the same seam allowance the entire time. This is Very Important to the finshed skirt!
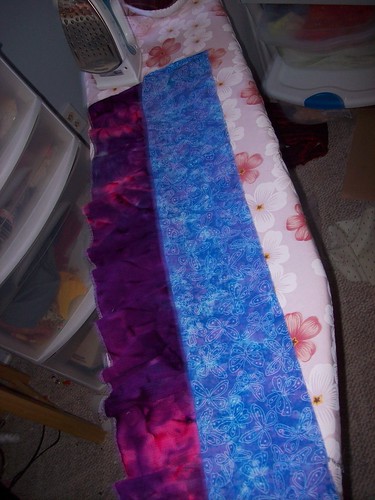
repeat, gathering the middle layer and attaching it to the top layer:

Fold the skirt in half, matching the tiers up as much as possible (this is why it was so important to keep the same seam allowance! If you didn't your tiers won't match up!) and sew up the side:
Gather the top of the skirt and attach to the shirt in the same way you attached the regular teeshirt dress. Finish the hem and you're done!
First, gather your materials. You will need a teeshirt and skirt fabric. The skirt fabric is totally up to you. You can use all one fabric and use the tiers to create fullness or you can use multiple fabrics. Not all these examples are on a teeshirt dress, but you can get an idea of the different things you can do with a tiered skirt:
Once you have decided on your fabrics you need to do some (simple) math. Decide how long you want the skirt to be. Divide that by the number of tiers you want your skirt to have. This is how WIDE each tier of the skirt will be except for the bottom tier. For the bottom tier you need to add a hem allowance. If you're folding up twice and stitching like we did in the first dress, add 2 inches.
So, if I want my finished skirt to be 15 inches long and I'm using 3 tiers, the first two tiers will be 5 inches wide (15/3= 5) and the bottom tier will be 7 inches wide (15/3= 5+2= 7)
My formula for determining the length of the tier is:
1st tier = X
2nd tier= X + (1/2 * X)
3rd tier= 2X
My most often used value for X is one cut salvage to salvage (side to side), or 45 inches. The second tier is then one cut salvage to salvage plus another 1/2 cut salvage to salvage and the third is two cuts salvage to salvage.
Sew your tiers together. They should look something like this:
Now you're going to gather the longest tier to fit with the shortest tier. Sew the two tiers together being careful to keep the same seam allowance the entire time. This is Very Important to the finshed skirt!
repeat, gathering the middle layer and attaching it to the top layer:
Fold the skirt in half, matching the tiers up as much as possible (this is why it was so important to keep the same seam allowance! If you didn't your tiers won't match up!) and sew up the side:
Gather the top of the skirt and attach to the shirt in the same way you attached the regular teeshirt dress. Finish the hem and you're done!
Teeshirt Twirly Dress
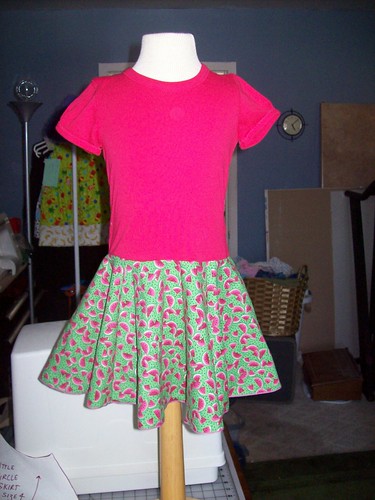
Haha! It's been waaaay more than a few days. Oh well, better late than never, right? This is my favorite version of the teeshirt dress to make for my daughter. It uses a little more fabric for the skirt and cut in a way that makes it nice and twirly, which is a must for the 3-4 year old set.
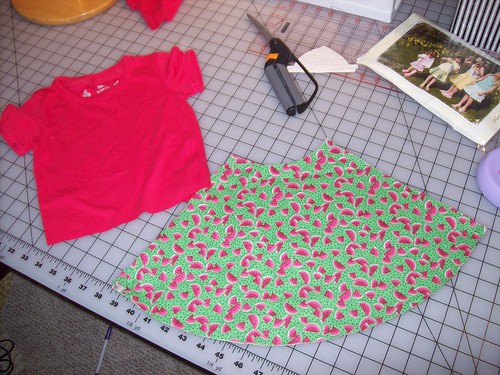
First, gather your materials. You need a teeshirt (duh!), a pattern for a circle skirt (I like Favorite Things Little Circle Skirt.), and about 1 yard of fabric. You might get by with less depending on the print you choose.
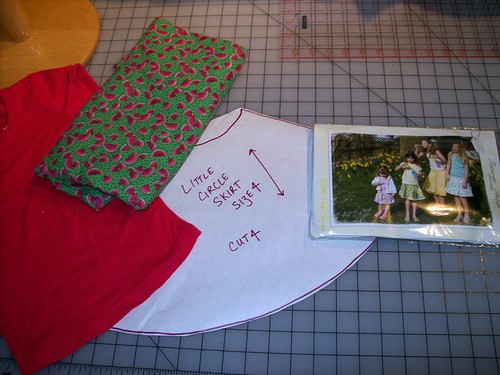
Cut out your skirt pieces based on your circle skirt pattern. Don't cut out any waist bands. You don't need them because you are attaching the skirt to the shirt. Pay attention to the arrow on the pattern piece: that should run up and down with the fabric. It may be tempting to try to conserve fabric by turning the pattern piece sideways, but don't do it! This is important to make the dress hang right when it's finished. Also cut your teeshirt off if you need to.
Now, sew your skirt pieces together. It will look like this when you are done:
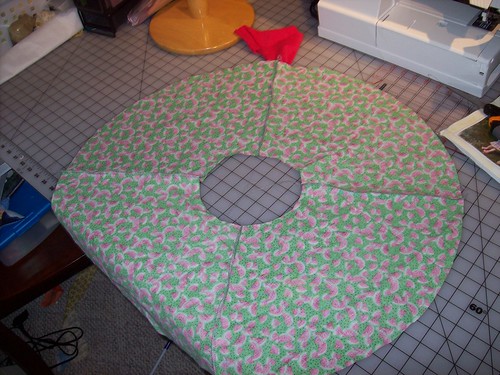
Fold the skirt in half. You want to be looking at two seams in the front with NO seams on the side. If you line up the seams so that there are two on the sides, you will also have a seam right down the front and right down the back, which is NOT flattering. ; ) Take pins, or a fabric marker and mark where the sides are. (Different fabric to make it easier to see the seams.)
Now line up those side markings with the sides of the shirt. The shirt should be right side out while you will be looking at the wrong side of the skirt fabric. Apparently I neglected to take a picture of this step with the circle skirt, but it's the same way you attach the skirt in the regular teeshirt dress:
Sew the skirt to the shirt. You will need to stop frequently to adjust the skirt as you are sewing a curved line (the skirt) to a straight line. Pull on the skirt fabric to make it somewhat straight as you sew it. Also try your hardest to line up the side you marked on the skirt to the side of the shirt.
Now all that's left to do is to hem!
Sunday, May 3, 2009
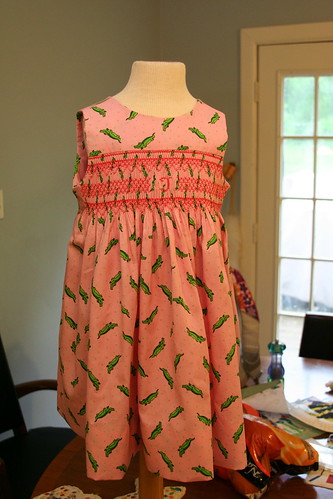
Alligator dress
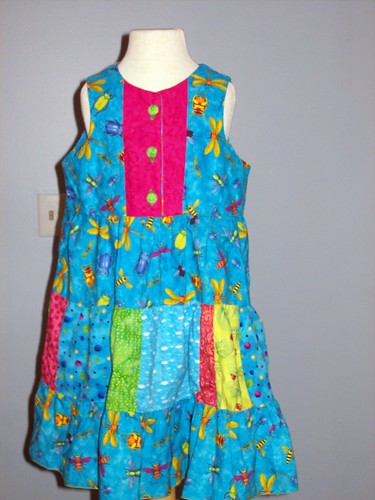
I finished this one up today. It was a for hire project for a friend. Actually, for her 3-year old niece whose name starts with J. Her aunt saw M's dress and wanted one exactly like it, only with pink fabric. I convinced her to go with this design instead. It has less smocking than a bishop so I could finish it in her time frame without feeling rushed. I'm pleased with how it turned out. She was pleased too.
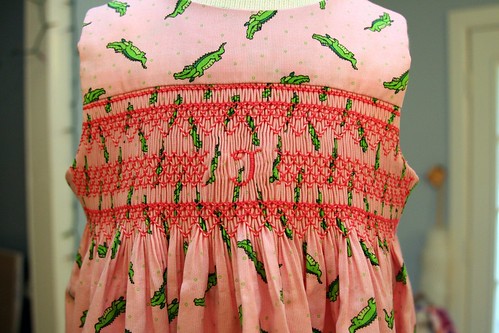
Things I discovered with this project: on a straight yoke dress with a monogram, you need to backsmock where the monogram is so the pleats don't get wonky. Spray starch is AWESOME stuff. Careful construction doesn't take that much longer than slapping the dress together but the results are MILES better. Blocking a straight yoke after smocking is ESSENTIAL for good construction.

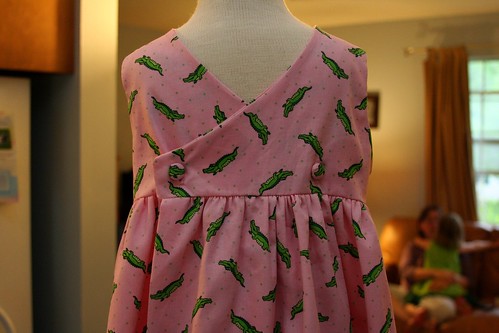
This is the back. It's a reverse wrap dress. I covered the buttons so the alligator heads were on them.
Things I discovered with this project: on a straight yoke dress with a monogram, you need to backsmock where the monogram is so the pleats don't get wonky. Spray starch is AWESOME stuff. Careful construction doesn't take that much longer than slapping the dress together but the results are MILES better. Blocking a straight yoke after smocking is ESSENTIAL for good construction.
This is the back. It's a reverse wrap dress. I covered the buttons so the alligator heads were on them.
Sunday, March 22, 2009
Variations on a Theme
There is a lot more you can do with the humble tee shirt dress.
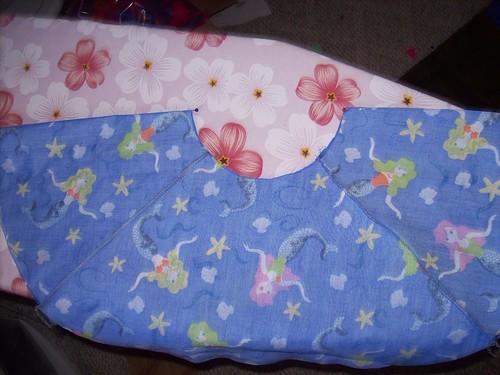
Tee shirt dress with a circle skirt:
Tee shirt dress with a tiered skirt:
Tee shirt dress with a tiered skirt and embellished top:
I've got the pics taken and ready to go to show you how to make these variations. I'll get the instructions up in the next day or so. : )
Tee shirt dress with a circle skirt:
Tee shirt dress with a tiered skirt:
Tee shirt dress with a tiered skirt and embellished top:
I've got the pics taken and ready to go to show you how to make these variations. I'll get the instructions up in the next day or so. : )
Tuesday, March 17, 2009
St. Patty's Day Sew and Tell
I thought the bishop dress deserved it's own post. Here are the other things I've finished up lately:
A bad picture of the bug dress. WG had another round of school pictures last week and this is what she chose to wear. I love that my girl loves bugs and worms but will only wear dresses.
This skirt is from the most recent issue of Ottobre kids. It is CRAZY full. The bottom ruffle was 308 inches long (7 cuts salvage to salvage) before I gathered it. It was like a big fabric intestine. (We deal with too much GI things in this house, can you tell?) I wasn't sure I'd like it because it reminded me a little bit of a pageant dress. Nothing against pageant dresses, but it's not really WG's style. It's really cute on her, though, and she has now decided that all of her shirts need to have her initials. Of course, I haven't been able to get a pic of her in the outfit...
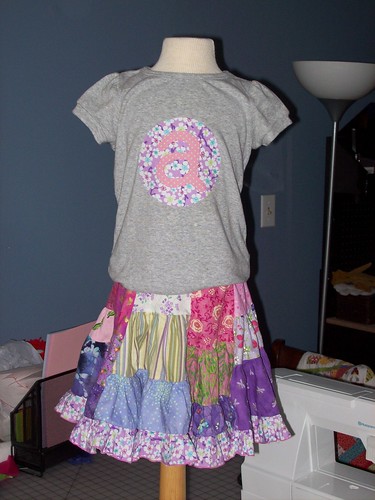
Here is Tim's coat, all finished! He did a great job. (Like my new countertop? He put that in, too!) This is more WG's style: striped leggings, polka dot socks, and a patchwork skirt. I made the skirt by sewing a charm pack into strips and then together. Easy peasy.

A bad picture of the bug dress. WG had another round of school pictures last week and this is what she chose to wear. I love that my girl loves bugs and worms but will only wear dresses.
This skirt is from the most recent issue of Ottobre kids. It is CRAZY full. The bottom ruffle was 308 inches long (7 cuts salvage to salvage) before I gathered it. It was like a big fabric intestine. (We deal with too much GI things in this house, can you tell?) I wasn't sure I'd like it because it reminded me a little bit of a pageant dress. Nothing against pageant dresses, but it's not really WG's style. It's really cute on her, though, and she has now decided that all of her shirts need to have her initials. Of course, I haven't been able to get a pic of her in the outfit...
Here is Tim's coat, all finished! He did a great job. (Like my new countertop? He put that in, too!) This is more WG's style: striped leggings, polka dot socks, and a patchwork skirt. I made the skirt by sewing a charm pack into strips and then together. Easy peasy.
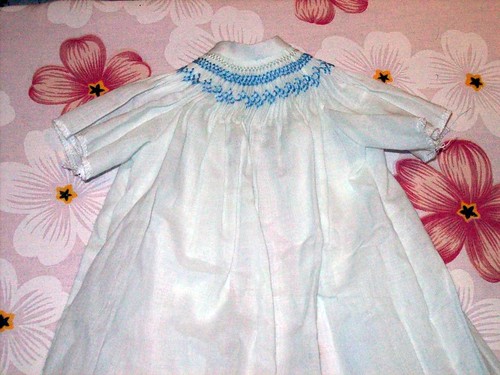
Cheap Therapy
This is a special dress for a special girl who is not my daughter. I made this for a friend in Michigan who doesn't know it's coming. Well, maybe she does now. It's my first bishop. I'm a little bit sad to send this dress away because I'm really happy with how it turned out. It makes me want to have a child with a first name starting with M just so they can wear it. At the same time, this dress has been my therapy for the last month and there is something about seeing it finished and sending it on that is quite fitting. 99% of the handwork on this dress was done in doctor's offices. I had just started smocking this dress when I found out I was pregnant. When I started bleeding I took it with me to the ER to work on while I waited. It turned out that my pregnancy was ectopic. Over the next month I had a lot of appointments to deal with that, and this dress came to every one. I find handwork relaxing. My mind wanders as I sew and I often come to solutions to problems while I'm working. In this case I found creating something beautiful for someone else theraputic. I think it's fitting that I've finished up this dress today when we have just been given the green light to try for another baby.
This is also an example of what you can accomplish in 5 minute snippets of time. I sewed the last snap on this morning while waiting for a meeting at the symphony office. Our personnel director saw me and commented that I was always sewing. That is the secret to how I accomplish so (sew?) much.
Monday, March 9, 2009
Simple Tee shirt dress part I

This is really easy, I promise!
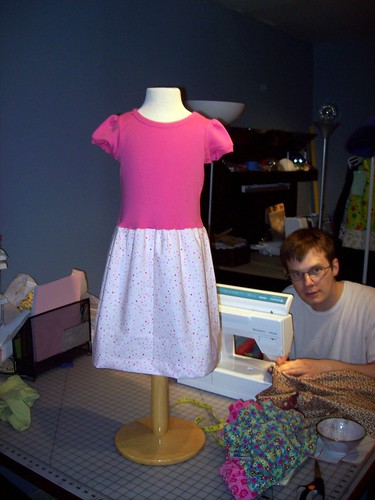
(Yup, that is my husband in the picture. He's working on a coat for our daughter. You gotta love a man who is secure enough in his masculinity to sew. He would want you to know, though, that he also fixes sewing machines and does manly things like run electricity, install flooring, and dispose of any dead squirrels our cat brings us. It's all about balance.)
First, gather your materials. You need a tee shirt, about 1/2 a yard of fabric, and the usual notions: pins, iron, marking pen, tape measure, scissors.
Measure the tee shirt against the intended recipient. Does it end past their waist? You may need to cut it off a bit. Don't get too happy with the scissors, you can always cut more off. Aim for where you'd like the top part to end plus about an inch for the seam allowance. The pink shirt was already cut, I added the green for comparison's sake.
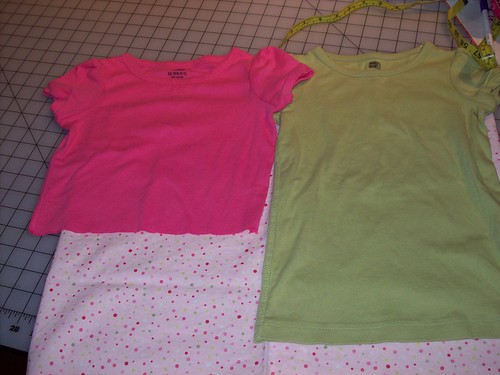
To determine how to cut your fabric, measure your recipient from their shoulder to where you'd like the dress to end. Subtract the length of the tee shirt. Add 3. (The three inches break down into 2 added inches for the hem plus one inch at the top for a seam allowance.) Cut the fabric from salvage to salvage. The salvages are the sides of the fabric that are woven and not frayed. When you bought the fabric, they cut it from salvage to salvage. Try to cut straight because it will really simplify your hemming later. For little girls to age 6 or so, a fabric width of 44 inches (which is salvage to salvage) is enough.
Now we're going to sew! Fold the skirt piece in half, right sides of the fabric together so that you are looking at the back of the fabric (not the patterned part). Match up the salvages. Sew it together using at least a 1/2 inch seam allowance, but also make sure that it's wide enough to have the entire salvage to the right of the needle. Unfortunately my camera pooped out so I don't have a picture of this step.
When you sew a seam, sew forward about an inch, then sew backward, and then sew forward to the end of the seam. At the end, sew backward about an inch, then forward to the end of the fabric. This secures the seam.
Press the seam open.
Good job! You're done with part I! Next up is gathering...
Tee shirt Dress Part II
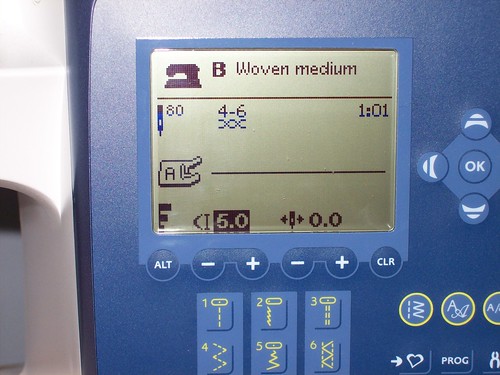
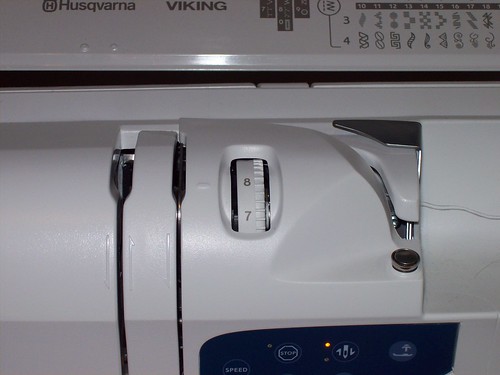
Now we're going to gather. First thing to do is to set the upper tension and stitch length. Usually upper tension is set to around 5 and the stitch length is 2.5. We're going to gather with a tension of 7 or 8 and a stitch length of 5. Check your manual if you are not sure where your tension and stitch length dials are.
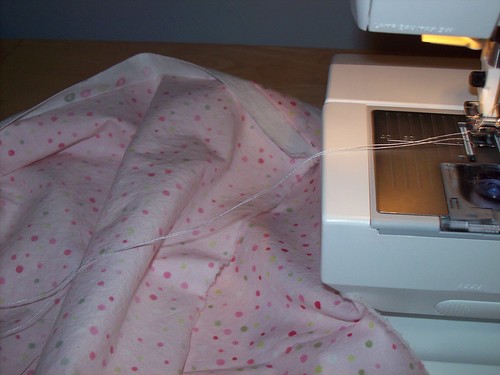
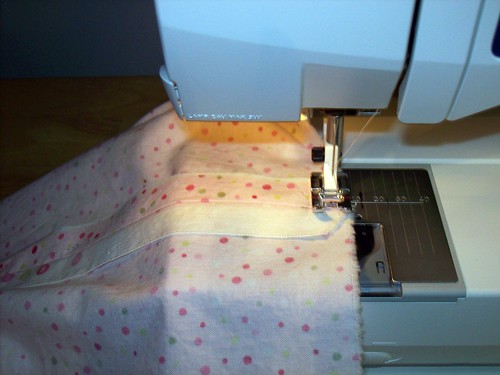
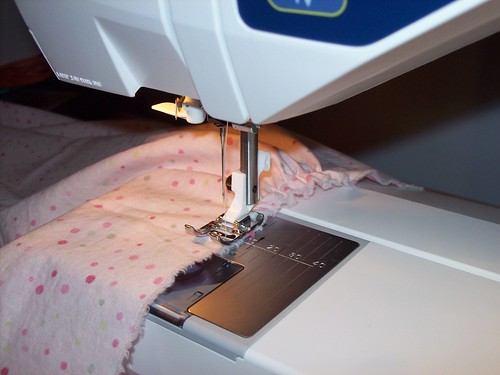
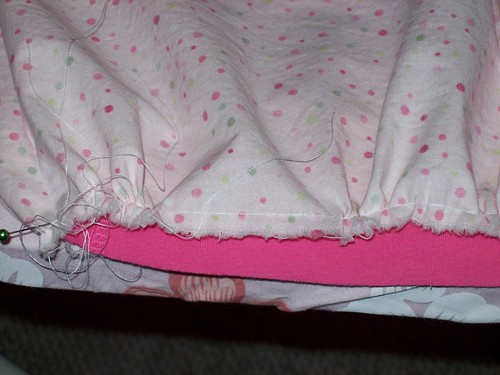
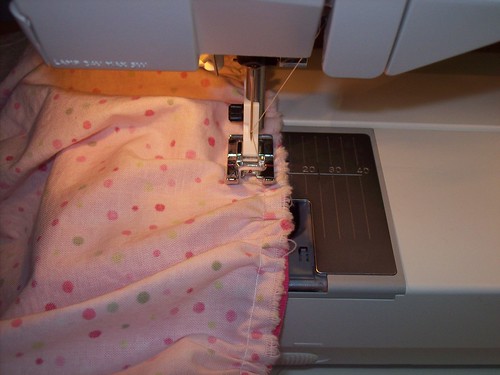
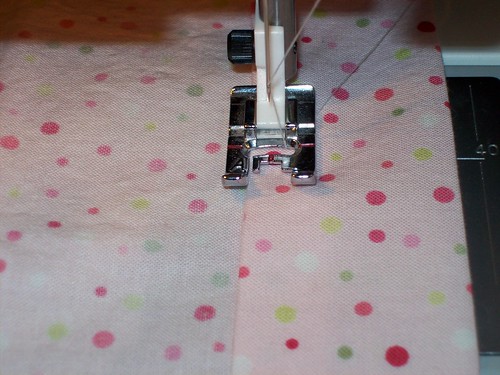
Fold the skirt tube in half with the seam on one side. Place a pin in the other side to mark where the half-way points of the tube are. Gather the fabric: Pull out a good 6 to 8 inch "tail" of both the needle and bobbin thread. Start where the seam is and line up the side of the presser foot with the edge of the fabric. Sew, allowing the fabric to gather itself as you go. STOP when you get to your halfway point, take the skirt off the machine making big thread tails. Then put the skirt back ON the machine and gather the rest of the way around.
Thread tails:
Presser foot placement:
Once you make it all the way around (don't forget to pull out nice long thread tails at the end!) you're done with part II. Next we will adjust the gathers and attach the skirt to the tee shirt!
Tee shirt Dress Part III
Okay, now we're going to adjust the gathers and sew the skirt to the tee shirt. This is a little bit tricky, but you can do it! Go slow, use as many pins as you need to, and don't feel bad if you need to do some ripping out!
First, lay your skirt on a table or ironing board. It should be inside out. Lay your tee shirt on top of the skirt. It should be right side out. Try to line up the side seam of the skirt with one of the sides of the shirt.
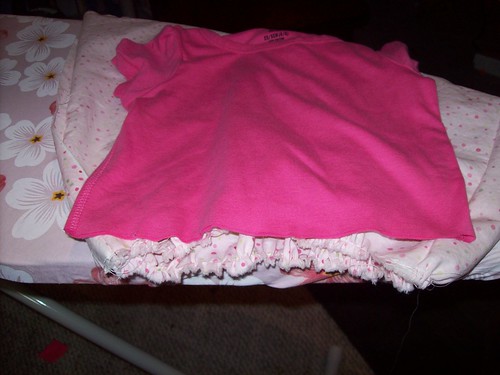
Now you are going to put the tee shirt INSIDE the skirt. The shoulders of the shirt should be aimed at the non-gathered edge of the skirt.
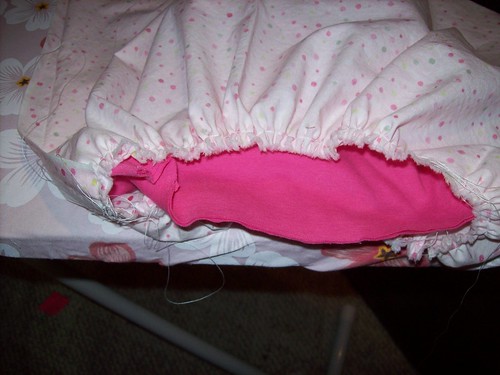
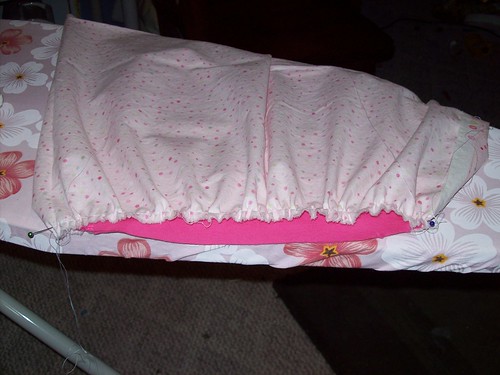
Pin the two pieces together at the side seam. Place another pin on the opposite side. Now you will need to adjust the gathers to fit the shirt. The skirt was gathered in two steps (in halves), so you can adjust the top part of the skirt to fit the top part of the shirt and then do the same with the bottom.
If your shirt is bigger than your skirt, GENTLY pull on the skirt gathers to smooth them out. This is why you left the enormous thread tails.
If your skirt is bigger than your shirt, find your thread tails, separate the two threads in the tail and GENTLY pull on one of them to make some more gathers. If one thread doesn't give, try the other.
Once the skirt opening is roughly the same size as the bottom of the shirt, adjust the gathers to make them even. You don't need to be obsessive about it, but try to make it as even as you can.
A bad distribution of gathers. See how there is a big straight part and a bunched part. That's bad.
A better distribution of gathers:

Put as many pins in as you need to feel comfortable! You can always adjust things as you go, too. I like to live dangerously, so I use minimal pins.
Now you are going to sew the skirt to the top. (Hooray!!!) Look at your tension and stitch length. Make sure they are not still set for gathering! Set your machine to sew a stretch stitch. Look in your manual to see how to do this. We will NOT switch to a stretch needle.
Sew around the edge of the skirt. Try to keep the gathering stitch on the skirt to the right of the needle. Adjust as you go and don't get too discouraged. Things that look like mistakes on the wrong side often are invisible on the right side. Go slow, try your best to keep the same seam allowance all the way around, and don't forget to secure the seam by sewing in reverse at the beginning and end.
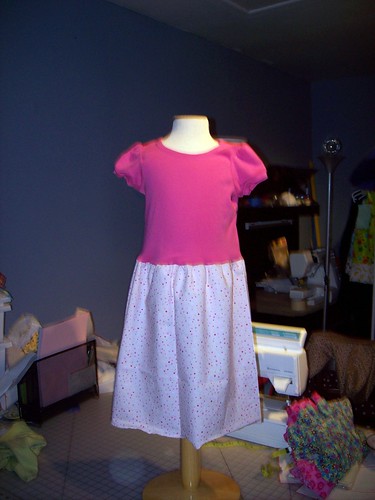
Turn it all right side out and here is what you have:
Next up we will finish the dress with a hem!
First, lay your skirt on a table or ironing board. It should be inside out. Lay your tee shirt on top of the skirt. It should be right side out. Try to line up the side seam of the skirt with one of the sides of the shirt.
Now you are going to put the tee shirt INSIDE the skirt. The shoulders of the shirt should be aimed at the non-gathered edge of the skirt.
Pin the two pieces together at the side seam. Place another pin on the opposite side. Now you will need to adjust the gathers to fit the shirt. The skirt was gathered in two steps (in halves), so you can adjust the top part of the skirt to fit the top part of the shirt and then do the same with the bottom.
If your shirt is bigger than your skirt, GENTLY pull on the skirt gathers to smooth them out. This is why you left the enormous thread tails.
If your skirt is bigger than your shirt, find your thread tails, separate the two threads in the tail and GENTLY pull on one of them to make some more gathers. If one thread doesn't give, try the other.
Once the skirt opening is roughly the same size as the bottom of the shirt, adjust the gathers to make them even. You don't need to be obsessive about it, but try to make it as even as you can.
A bad distribution of gathers. See how there is a big straight part and a bunched part. That's bad.
A better distribution of gathers:
Put as many pins in as you need to feel comfortable! You can always adjust things as you go, too. I like to live dangerously, so I use minimal pins.
Now you are going to sew the skirt to the top. (Hooray!!!) Look at your tension and stitch length. Make sure they are not still set for gathering! Set your machine to sew a stretch stitch. Look in your manual to see how to do this. We will NOT switch to a stretch needle.
Sew around the edge of the skirt. Try to keep the gathering stitch on the skirt to the right of the needle. Adjust as you go and don't get too discouraged. Things that look like mistakes on the wrong side often are invisible on the right side. Go slow, try your best to keep the same seam allowance all the way around, and don't forget to secure the seam by sewing in reverse at the beginning and end.
Turn it all right side out and here is what you have:
Next up we will finish the dress with a hem!
Tee shirt Dress Part IV
Time to finish things up with a hem! There are many ways to hem a dress. This is the easiest way. It's not an ugly way to finish a dress, but it's not as refined as other hemming techniques. If you know how to hem by hand or do a blind hem by machine, go for it! We'll get to that in a few projects.
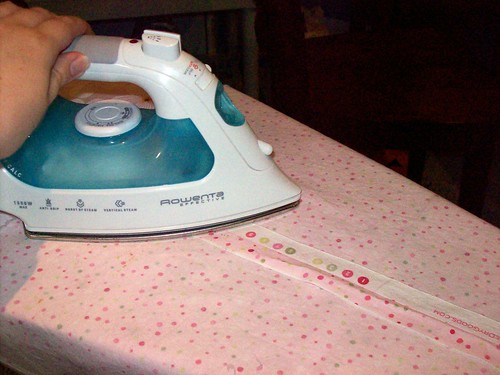
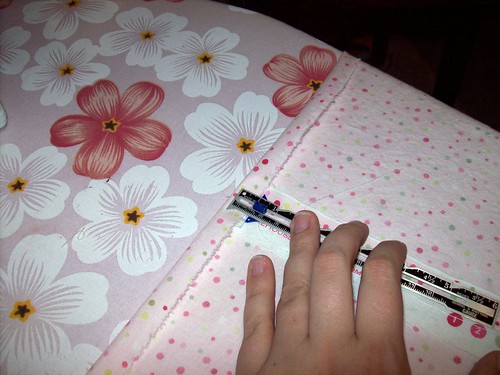
Turn the dress inside out. Heat your iron up. Turn the bottom of the dress up 1/2 an inch. The little ruler in the photos is one of my favorite sewing tools. It has a little slide that makes it incredibly easy to accurately mark measurements. I know it looks like I turned things up more than 1/2 inch in the picture. I fixed it.
Work your way around the dress, turning up 1/2 inch and pressing well as you go.
Now turn the bottom up 1-1/2 inches and press all the way around. Notice how the raw edge of the fabric is still turned under from step one...
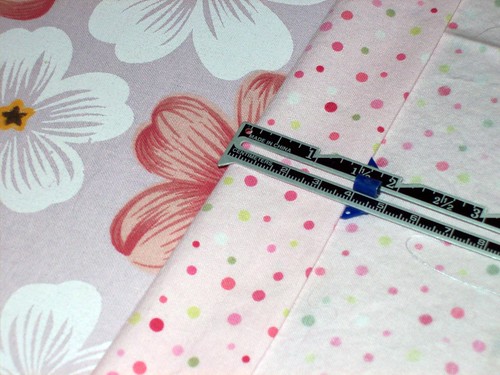
Secure the hem with pins if you want. No shame in using as many pins as it takes to make you comfortable. Make sure your machine is set for a straight stitch with a tension of 4 or 5 and a stitch length of 2.5. You want the needle to be close to the edge of the turned up hem. If you can move your needle to the left, you can experiment with that. I have a little notch in my presser foot that I lined up with the edge of the hem.
Sew all the way around remembering to secure the seam by sewing backward at the beginning and end. Try your best to keep the same distance from the edge of the hem.
Clip your threads (I always forget this!), turn the dress right side out, and you're DONE!!!!!
Turn the dress inside out. Heat your iron up. Turn the bottom of the dress up 1/2 an inch. The little ruler in the photos is one of my favorite sewing tools. It has a little slide that makes it incredibly easy to accurately mark measurements. I know it looks like I turned things up more than 1/2 inch in the picture. I fixed it.
Work your way around the dress, turning up 1/2 inch and pressing well as you go.
Now turn the bottom up 1-1/2 inches and press all the way around. Notice how the raw edge of the fabric is still turned under from step one...
Secure the hem with pins if you want. No shame in using as many pins as it takes to make you comfortable. Make sure your machine is set for a straight stitch with a tension of 4 or 5 and a stitch length of 2.5. You want the needle to be close to the edge of the turned up hem. If you can move your needle to the left, you can experiment with that. I have a little notch in my presser foot that I lined up with the edge of the hem.
Sew all the way around remembering to secure the seam by sewing backward at the beginning and end. Try your best to keep the same distance from the edge of the hem.
Clip your threads (I always forget this!), turn the dress right side out, and you're DONE!!!!!
Subscribe to:
Posts (Atom)